Posted on Leave a comment

What You Should Consider When Choosing Concealer

Concealer is one of those essential products that can really elevate your makeup routine. It’s a versatile tool that helps to cover blemishes, dark circles, and any imperfections that may pop up throughout the day. How to choose and apply concealer can make a significant difference in achieving that flawless look everyone desires.

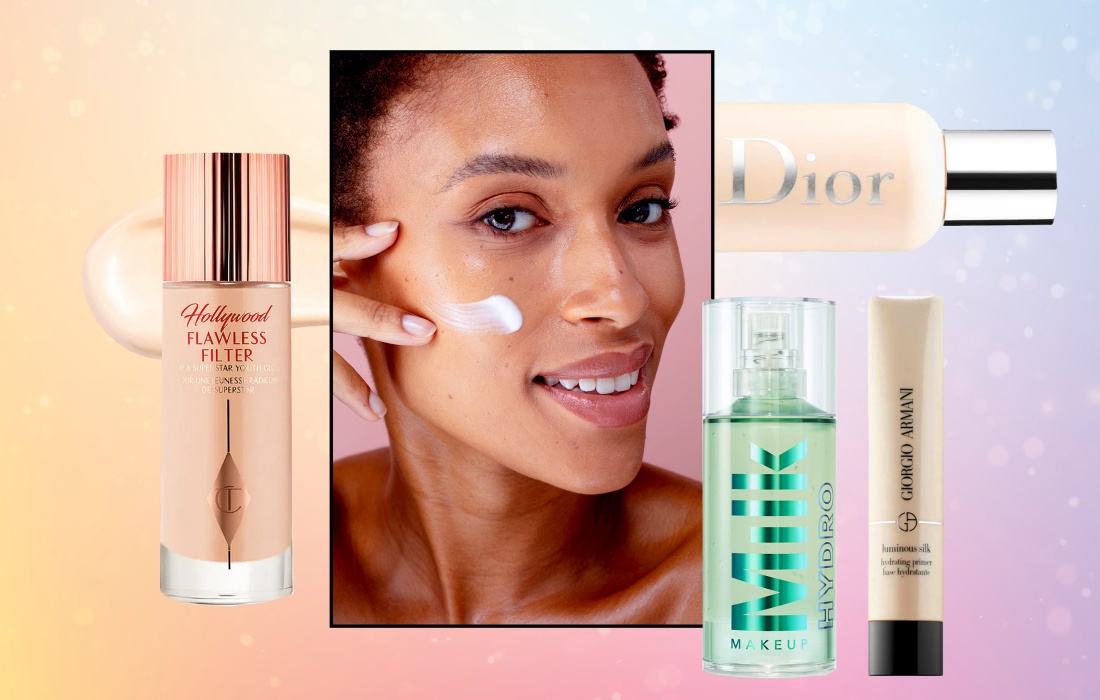
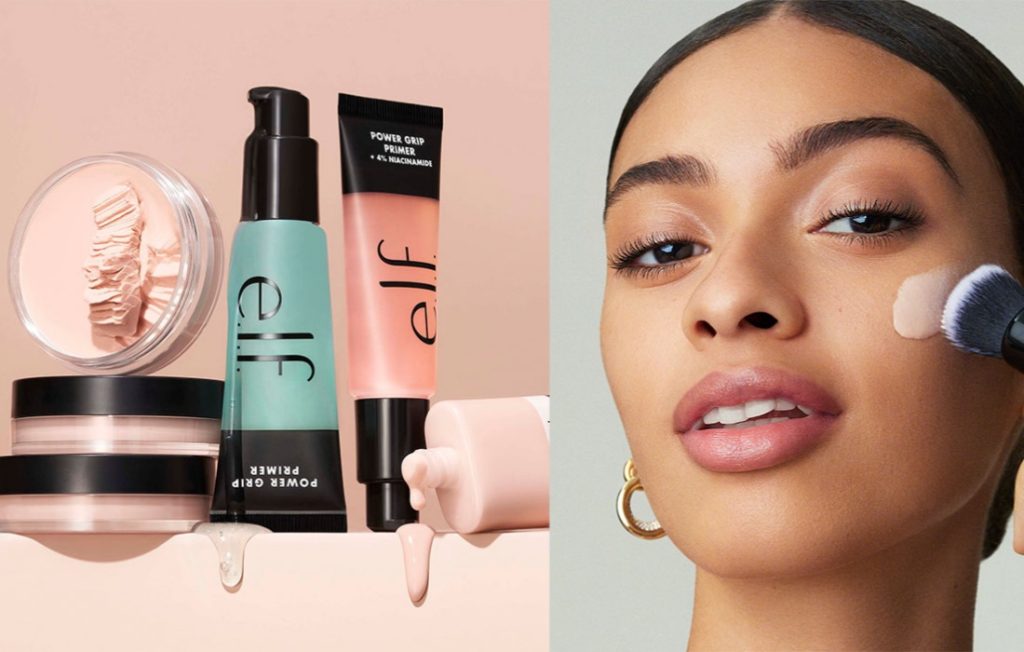
First things first, selecting the right concealer is crucial. There are various formulations available, from liquid to cream and stick. Liquid concealers are often lighter and work well for under-eye areas, while cream or stick options provide more coverage for spots and redness. Finding a shade that closely matches your skin tone or is slightly lighter can help brighten your complexion without looking too obvious.

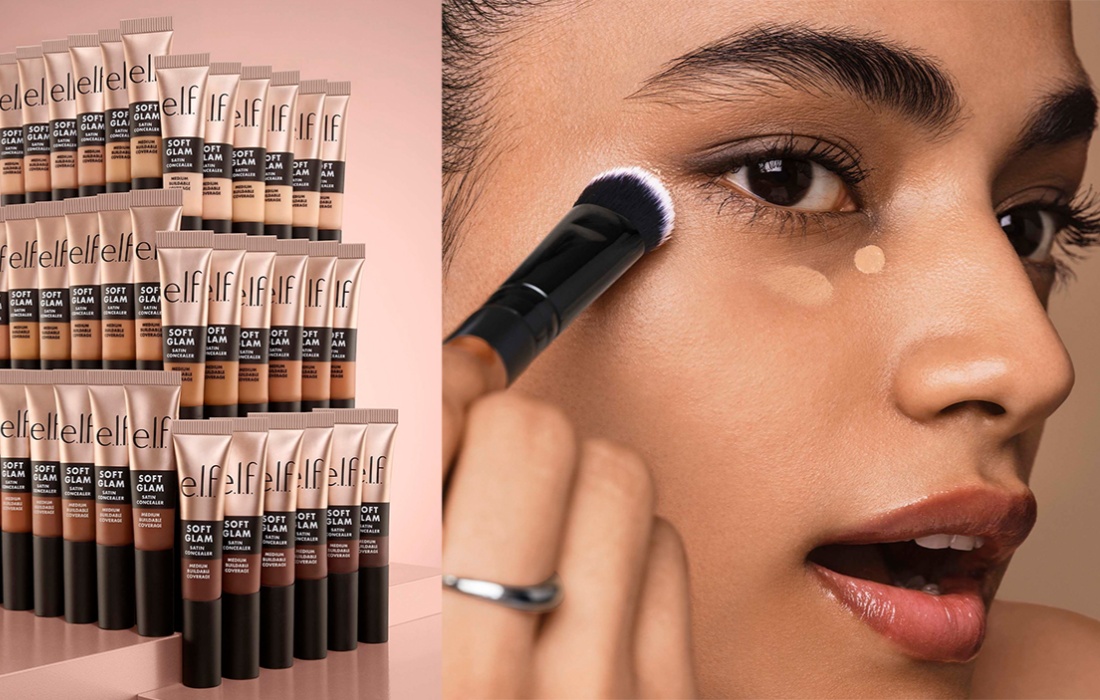
When it comes to application, technique is everything. For under-eye concealer, applying a small amount in a triangular shape under the eyes can create a lifting effect. Using your ring finger or a damp makeup sponge, gently tap the product in. This tapping motion helps to blend the concealer seamlessly into your skin, ensuring it doesn’t settle into fine lines. For blemishes, a more precise approach is needed. Use a small brush or your fingertip to dab the concealer directly onto the imperfection, then blend the edges for a smooth finish. Building the coverage gradually is a smart move, as it’s easier to add more product than to remove excess.

Close up of woman with natural makeup applying corrector on flawless fresh skin, doing make up. Girl after shower put concealer under eye area. Beauty face, skin care. Copy space, banner, advertising.

Setting your concealer is another important step. A light dusting of translucent powder can help keep everything in place throughout the day. Using a fluffy brush, apply the powder gently to areas where you’ve applied concealer. This helps prevent creasing, especially in the under-eye region, and keeps your makeup looking fresh.

For those dealing with particularly stubborn dark circles, incorporating a color corrector can make a big difference. A peach or orange-toned corrector can neutralize the blue tones of dark circles, creating a perfect base for your concealer. After blending the corrector, layering a skin-toned concealer on top can give you that bright, awake look everyone wants.

It’s also essential to remember that less is often more when it comes to concealer. Over-applying can lead to a cakey appearance, which is not ideal. Starting with a small amount and gradually building up coverage allows for a more natural finish that looks effortless.

Throughout the day, keeping an eye on your concealer’s performance is a good idea. Touching up may be necessary, especially in areas that tend to get oily. A quick dab with your fingertip can refresh your look without disturbing the rest of your makeup.

Mastering the art of concealer can truly enhance your makeup routine, helping you feel more confident and polished. With the right techniques and products, achieving a flawless look becomes much easier. Embrace the magic of concealer and enjoy experimenting with different styles to find what works best for you.

Posted on Leave a comment

What You Need to Know About Makeup Primers for a Flawless Finish

Makeup primers have become a staple in many beauty routines. They can be a game changer, helping your makeup stay put while creating a smooth canvas. Understanding how to choose and apply a primer can elevate your makeup game to a whole new level.

The first thing to consider is your skin type. Different primers cater to various needs. For oily skin, a mattifying primer works wonders by controlling shine and minimizing the appearance of pores. On the other hand, those with dry skin might benefit from a hydrating primer that adds moisture and creates a dewy finish. Combination skin can find balance with a lightweight, versatile primer that caters to both needs.

Once you’ve identified your skin type, it’s time to look at the texture of the primer. Some primers are gel-based, while others are creamier. Gel primers tend to feel lightweight and are great for a fresh finish. Cream primers can provide extra hydration, making them ideal for dry skin. Testing out different textures can help find the perfect match for your skin.

Application is key to maximizing the benefits of your primer. Start with clean, moisturized skin. A small amount of primer goes a long way. Using your fingers or a makeup sponge, apply the primer in a thin layer, focusing on areas where makeup tends to fade or settle into fine lines. This technique ensures an even application and allows the primer to work its magic.

Letting the primer set for a minute or two before applying foundation is a good practice. This waiting period allows the product to adhere to the skin, creating a better base for your makeup. Once the primer has set, applying foundation becomes much smoother, and the overall finish looks more polished.

Another great advantage of using a primer is its ability to enhance the longevity of your makeup. Many primers contain ingredients that help to lock in your foundation, keeping it in place throughout the day. This is especially beneficial for those long days or special events when touch-ups aren’t always possible.

For an extra boost, consider using a color-correcting primer. These primers come in various shades to address specific skin concerns, such as redness or dullness. A green-tinted primer can neutralize redness, while a lavender one can brighten sallow skin. Incorporating color-correcting primers can provide a more balanced complexion even before foundation is applied.

Don’t forget to experiment with layering products. Some people find that using a primer underneath their foundation and then adding a setting spray on top creates the ultimate look. This combination helps to ensure that makeup stays fresh and vibrant all day long.

Incorporating a primer into your makeup routine can truly make a difference. It not only enhances the application of foundation but also improves the overall look and longevity of your makeup. With the right choice and application techniques, achieving a flawless finish becomes an exciting and achievable goal. Embracing the benefits of makeup primers can elevate your beauty routine, allowing you to feel confident and radiant.

Posted on Leave a comment

What to Try for Flawless Eyeliner Application

Eyeliner is one of those beauty staples that can completely change your look. Whether you’re aiming for a subtle enhancement or a bold statement, the right eyeliner technique can make all the difference. It’s not just about the product; it’s about how you apply it. With a few tips and tricks, you can master the art of eyeliner and elevate your makeup game.

Choosing the right eyeliner is the first step in this journey. There are so many options available, from liquid and gel to pencil and felt-tip pens. Liquid eyeliners are perfect for creating sharp, defined lines, while gel liners offer a creamy texture that glides on smoothly. Pencil eyeliners are great for a softer, more blended look. Finding the right formula that suits your style and comfort level is essential.

When it comes to application, having a steady hand is crucial. Resting your elbow on a flat surface can help provide stability. A common technique is to look straight into the mirror and gently pull the outer corner of your eye to create a tighter surface. This makes it easier to draw a clean line. For those just starting out, breaking the line into smaller dashes along the lash line can make the process less intimidating. Once you have those dots in place, connecting them can lead to a smooth finish.

Creating the perfect shape is all about personal preference. A classic winged eyeliner adds a touch of drama and can be achieved by extending the line slightly beyond the outer corner of your eye. For a more natural look, consider tightlining, which involves applying eyeliner directly to the waterline or just above the lashes. This technique enhances your eyes without looking overly made up. The thickness of your line can also vary; a thin line gives a subtle lift, while a thicker line makes a bolder statement.

Blending can take your eyeliner to the next level. Smudging a pencil liner with a brush can create a soft, smoky effect that’s perfect for evenings out. Setting your liner with a matching eyeshadow can help it last longer and prevent smudging throughout the day. This layering technique not only adds depth but also ensures your eyeliner stays put, even during long hours.

Practice is key when it comes to eyeliner application. It’s a skill that improves over time. Taking the time to experiment with different styles can help you find what works best for you. Watching tutorials or practicing in various lighting can also boost your confidence and refine your technique.

After a long day, removing your eyeliner properly is just as important as applying it. Using a gentle makeup remover or micellar water ensures that your skin stays healthy and irritation-free. This step is crucial for maintaining the health of your lashes and the delicate skin around your eyes.

Eyeliner is not just a makeup product; it’s a way to express your style and personality. With the right tools and techniques, mastering eyeliner becomes an enjoyable part of your beauty routine. Embrace the process, and you’ll discover how transformative this simple product can be.

Posted on Leave a comment

What Iridescent Shimmer Can Add to Your Makeup Routine

Iridescent shimmer has become a must-have in the beauty world. This magical finish adds a touch of sparkle and dimension to any makeup look, instantly elevating your style. Whether you’re going for a subtle glow or a full-on glam effect, incorporating iridescent shimmer into your routine can transform your overall appearance.

Starting with the right products is essential. Highlighters and eyeshadows in iridescent shades can create that captivating effect. These products often contain finely milled shimmer that catches the light beautifully. When choosing a highlighter, look for shades that complement your skin tone. For fair skin, soft pinks and icy whites work wonders, while deeper skin tones can rock golds and bronzes. The key is to find a shade that enhances your natural glow without overpowering it.

Application is where the fun begins. For a fresh, luminous look, applying iridescent highlighter to the high points of your face can make a significant difference. Think cheekbones, brow bones, and the bridge of your nose. A fan brush or a damp beauty sponge can help blend the product seamlessly into your skin, creating a natural-looking radiance. The goal is to achieve a glow that looks like it’s coming from within.

When it comes to eyes, iridescent shimmer can take your eye makeup to the next level. Using a shimmering eyeshadow on the lids can create a stunning effect, especially when paired with matte shades in the crease. This contrast adds depth and dimension, making your eyes pop. Applying the shimmer with your fingertip can enhance the pigmentation, allowing for a more intense look. Don’t shy away from layering; building up the product can create a more dramatic effect for evening looks.

For those who want to experiment, adding iridescent shimmer to your lips can also be a game changer. A shimmering lip gloss or a dab of highlighter in the center of your lips can create a fuller appearance. This technique draws attention and adds a playful touch to your makeup. Mixing a bit of shimmer into your favorite lipstick can also give it a unique twist, perfect for special occasions.

Setting your makeup is crucial, especially when working with shimmery products. A good setting spray can help lock everything in place while adding an extra layer of glow. This ensures that your makeup stays fresh and luminous throughout the day or night.

Finding the right balance is essential when using iridescent shimmer. Too much can overwhelm your look, while just the right amount can enhance your features beautifully. Experimenting with different placements and intensities can help you discover what works best for your style. Watching tutorials or following beauty influencers can also provide fresh ideas and techniques to try.

Iridescent shimmer can truly elevate your makeup game, adding a touch of magic and allure. With the right products and techniques, anyone can achieve a stunning look that highlights their natural beauty. Embracing this trend allows for creativity and self-expression, making every makeup application a fun experience.

Posted on Leave a comment

How to Gently Remove Your Eyelash Extensions at Home

Taking care of your eyelash extensions is essential for maintaining their beauty and ensuring your natural lashes stay healthy. When it comes time to remove them, doing it gently is key. Many people worry about damaging their natural lashes during the removal process, but with the right approach, it can be a breeze.

Having the right tools ready makes a world of difference. Start with a gentle, oil-free makeup remover or a specially formulated eyelash extension remover. These products are designed to break down the adhesive without harming your natural lashes. Avoid using regular makeup removers that contain oils, as they can weaken the bond and lead to lash loss.

Warm water is your best ally. Using lukewarm water helps to soften the adhesive, making removal easier. Soak a cotton pad in the warm water and hold it against your closed eyelids for a minute. This step not only relaxes the adhesive but also prepares your lashes for gentle removal.

Once your lashes are prepped, grab a clean spoolie brush. Lightly comb through the extensions, starting from the tips and moving toward the base. This technique helps to loosen the lashes without pulling on your natural ones. Patience is crucial here; tugging can lead to breakage or irritation.

If some lashes still cling on stubbornly, don’t worry. Apply a small amount of your chosen remover directly to the base of the lashes using a cotton swab. Allow it to sit for a minute to penetrate the adhesive. After that, gently wiggle the extension back and forth until it releases. Taking your time with this step helps protect your natural lashes.

After you’ve removed all the extensions, it’s time to cleanse your eyelids thoroughly. Use a gentle facial cleanser to remove any leftover product. Following this, applying a nourishing eyelash serum can promote the health of your natural lashes. This step is particularly beneficial after wearing extensions for a while.

Keep an eye on your lashes after removal. If you notice any irritation or discomfort, seeking advice from a professional can provide peace of mind. They can offer insights and ensure your natural lashes remain in great shape.

Removing eyelash extensions doesn’t have to be a stressful experience. With the right products and techniques, you can keep your natural lashes safe while enjoying the beauty of extensions. Embrace the process, and your lashes will be grateful.

Posted on Leave a comment

How to Find the Perfect Mascara for Your Lashes

Choosing the right mascara can feel overwhelming with so many options on the market. Each tube promises to deliver luscious, voluminous lashes, but not every formula lives up to the hype. Knowing what to look for can make a huge difference in achieving that eye-catching look.

Start by thinking about what you want your mascara to do. Are you after volume, length, or both? Volumizing mascaras typically have thicker formulas that help plump up your lashes, giving them a fuller appearance. These often come with brushes designed to coat and separate each lash for that dramatic effect. On the other hand, if length is your goal, look for lengthening mascaras. These formulas usually have a lighter consistency and come with narrow brushes that help grab onto each lash, making them look longer and more defined.

Waterproof mascara is another option to consider, especially for long days or special occasions. It stays put through sweat, tears, and humidity, ensuring your lashes look great from morning to night. However, keep in mind that waterproof formulas can be tricky to remove, so having a reliable makeup remover is a must. For everyday wear, regular formulas are often easier to apply and remove, making them a convenient choice for those who prefer a more casual makeup routine.

The brush design is just as important as the formula itself. Different shapes can create different effects. A curved brush can help lift and curl your lashes, while a straight brush can provide more volume and separation. Some brands even offer unique brushes that promise to reach every lash, ensuring an even application. Experimenting with various brush types can lead to discovering what works best for your lashes and eye shape.

Texture matters too. Some people love a lightweight formula that feels almost weightless, while others prefer something thicker for that dramatic flair. A lighter formula may feel more comfortable, especially if you wear mascara daily. On the other hand, a thicker formula can give that bold look many people desire. Finding the right texture can transform your lash experience.

Sensitivity is also a key factor. Many brands offer hypoallergenic formulas for those with sensitive eyes. These options contain fewer irritants, making them less likely to cause discomfort. Always check the ingredient list to ensure the mascara is gentle on your eyes.

Application technique can significantly affect the final look. Starting at the base of your lashes and wiggling the wand as you move upward helps to coat each lash evenly. Building up layers can create more volume, but adding too much at once might lead to clumping. A few light coats usually work best for achieving that perfect look without overwhelming your lashes.

Reading reviews can provide valuable insight into how well a mascara performs. Many beauty lovers share their experiences with different brands, highlighting what works and what doesn’t. Look for products that receive positive feedback regarding wear time, ease of application, and overall performance.

Finding the perfect mascara can elevate your makeup game and enhance your natural beauty. By considering your desired look, brush design, and texture, you can discover a mascara that truly meets your needs. Embracing these tips will help you enjoy beautiful lashes that make a statement.

Posted on Leave a comment

How to Enjoy Japanese Eyelash Extensions for a Natural Look

Japanese eyelash extensions have gained popularity for their ability to create a soft, natural look that enhances your eyes beautifully. This technique focuses on individual lash application, resulting in a lightweight feel and a seamless blend with your natural lashes. How to choose, apply, and maintain these extensions can help you achieve stunning results that last.

Choosing the right type of Japanese eyelash extensions is the first step toward achieving your desired look. These extensions come in various materials, including silk and mink, each offering a different finish. Silk lashes are known for their glossy appearance, while mink lashes provide a softer, more natural look. When selecting the length and thickness, consider your eye shape and personal style. A mix of lengths can create a more dynamic appearance, with shorter lashes on the inner corners and longer ones on the outer edges.

The application process is crucial for achieving that flawless finish. Finding a skilled technician who specializes in Japanese eyelash extensions is essential. During the appointment, the technician will carefully isolate each natural lash and attach the extension using a high-quality adhesive. This meticulous technique ensures that the extensions look natural and last longer. The goal is to achieve a fan effect that enhances the eyes without looking overly dramatic.

After getting your Japanese eyelash extensions, maintenance is key to keeping them looking fresh. Regular touch-ups are necessary to fill in any gaps as your natural lashes shed. Scheduling appointments every three to four weeks is common, depending on your natural lash growth cycle. During these visits, the technician can assess the health of your natural lashes and make any adjustments needed.

At-home care also plays a significant role in maintaining your extensions. Using oil-free makeup removers is a must, as oils can break down the adhesive and cause the lashes to fall out prematurely. When cleansing your face, gently wash around the lashes without rubbing your eyes. A soft lash brush can help keep your extensions looking neat and fluffy, ensuring they maintain their beautiful shape.

Avoiding heat and steam is another tip for prolonging the life of your Japanese eyelash extensions. Activities like saunas or hot yoga can weaken the adhesive, leading to premature shedding. It’s wise to steer clear of these environments, especially in the first 24 to 48 hours after application when the adhesive is still curing.

Japanese eyelash extensions can truly elevate your beauty routine, providing a polished and effortless look. They allow you to wake up feeling fabulous without needing to apply mascara. With the right selection, application, and care, you can enjoy the beauty of these extensions for weeks on end. Embracing this trend not only enhances your eyes but also simplifies your daily makeup routine, making every day feel like a special occasion.

Posted on Leave a comment

How to Elevate Your Eyelash Curl for Stunning Results

Achieving beautifully curled eyelashes can transform your look, making your eyes appear larger and more expressive. The right curl can add a touch of glamour to any makeup style, and mastering this technique can be a game changer in your beauty routine.

Investing in a good quality eyelash curler is essential. Look for one that has a gentle curve and a padded clamp. This design helps to prevent pinching and ensures that your lashes curl evenly. Before using the curler, warm it slightly with a hairdryer for a few seconds. This extra heat can help create a more lasting curl, similar to how a curling iron works on hair. Just be sure to test the temperature on your wrist to avoid any burns.

Once your curler is ready, take a small section of your lashes and position them in the curler. Aim to get as close to the base of your lashes as possible without pinching your eyelid. Gently squeeze the curler for about 10 to 15 seconds. For an even more dramatic curl, consider doing this in two sections: first at the base and then mid-length. This technique helps create a more natural-looking curl that lifts the lashes beautifully.

After curling, applying mascara is the next step to enhance your look. Choose a formula that adds volume and length, as this will complement the curl you’ve created. When applying mascara, focus on the roots and wiggle the wand as you move upward. This technique not only adds more product to the base but also helps to maintain the curl. For added drama, consider applying a second coat once the first layer dries.

To keep your curl looking fresh throughout the day, using a waterproof mascara can help. Waterproof formulas tend to hold curls better and resist smudging, making them ideal for long days or special occasions. However, be mindful of removing waterproof mascara at the end of the day, as it can be more challenging to take off. A good oil-based makeup remover can help dissolve the product without pulling on your lashes.

Maintaining healthy lashes is just as important as achieving the perfect curl. Incorporating a lash serum into your nightly routine can promote growth and strength. Look for serums that contain nourishing ingredients like biotin and peptides. Regularly conditioning your lashes helps prevent breakage and keeps them looking their best.

Incorporating these tips into your beauty routine can elevate your eyelash curl and make your eyes pop. Embracing this technique not only enhances your makeup looks but also boosts your confidence. With a little practice and the right products, anyone can achieve stunning, curled lashes that frame the eyes beautifully. This simple yet effective enhancement can make all the difference in your overall appearance, leaving you feeling fabulous and ready to take on the day.

Posted on Leave a comment

What It Takes to Achieve a Flawless Makeup Look

Creating a flawless makeup look is an art that many aspire to master. The goal is to enhance natural beauty while achieving that smooth, polished appearance. Whether preparing for a special occasion or just wanting to feel confident in everyday life, knowing the right techniques and products can make all the difference.

The first step in achieving a flawless finish starts with skincare. A well-prepped canvas is essential for any makeup application. Begin with a gentle cleanser to remove any impurities, followed by a hydrating moisturizer that suits your skin type. Applying a primer afterward can help to fill in pores and create a smooth surface for makeup. Look for a primer that offers a matte finish if oily skin is a concern, or a luminous one for dry skin types. This step sets the stage for a long-lasting look.

Foundation is where the magic begins. Choosing the right foundation shade is crucial. It should seamlessly blend into your skin tone. Testing a few shades on your jawline can help find the perfect match. For a flawless look, apply foundation with a damp makeup sponge or a brush, working from the center of the face outward. This technique helps achieve an even application while allowing the foundation to look more natural.

Concealer is your best friend when it comes to covering blemishes or dark circles. A creamy concealer can provide excellent coverage without appearing cakey. Applying it in a triangular shape under the eyes not only conceals but also brightens that area. Blend it well to avoid harsh lines, ensuring it looks seamless against your foundation.

Setting the foundation and concealer is essential for longevity. A translucent setting powder can keep everything in place without adding extra color. Lightly dust it over areas that tend to get oily, such as the T-zone. For those with dry skin, a setting spray can add a dewy finish while locking in makeup.

Blush and bronzer can add dimension to the face. A soft blush on the apples of the cheeks gives a natural flush, while bronzer can create warmth and definition. Applying bronzer along the jawline, temples, and under the cheekbones can give that sun-kissed look without the need for excessive sun exposure.

Eyes are a focal point in any makeup look. A neutral eyeshadow palette is versatile and can be used for both everyday wear and more dramatic looks. Layering different shades can create depth, while a touch of highlighter on the inner corners of the eyes can make them pop. Finishing with mascara adds volume and length, enhancing the overall appearance.

A perfect lip color ties everything together. Whether opting for a bold red or a subtle nude, choosing a shade that complements your overall look is key. A lip liner can help define the lips and prevent feathering, ensuring a polished finish.

Achieving a flawless makeup look involves a combination of good skincare, the right products, and effective techniques. With practice and experimentation, anyone can create a beautiful, radiant appearance that enhances their unique features. Embrace the process and enjoy the art of makeup.

Posted on Leave a comment

How to Effortlessly Remove Your Water-Resistant Eyelash Extensions

When it comes to maintaining beautiful eyelash extensions, knowing how to remove them properly is just as important as the application process. Water-resistant eyelash extensions can give you that stunning look, but they also require a bit more care when it’s time to take them off. Let’s dive into some effective tips for removing those lashes without damaging your natural ones.

Having the right products on hand makes all the difference. Look for a gentle, oil-free makeup remover or a specialized eyelash extension remover. These products are designed to break down the adhesive without harming your natural lashes. Avoid using regular makeup removers that contain oils, as they can weaken the bond and lead to premature lash loss.

Warm water can be your best friend. Using lukewarm water helps to soften the adhesive, making the removal process smoother. Soak a cotton pad in the warm water and hold it against your closed eyelids for a few moments. This step not only relaxes the adhesive but also prepares your lashes for a gentle removal.

Once your lashes are ready, take a clean spoolie brush and carefully comb through the extensions. Start from the tips and work your way toward the base. This technique helps to loosen the lashes without pulling on your natural ones. Remember to be gentle; tugging can lead to breakage or irritation.

If some lashes are still stubbornly clinging on, don’t panic. Apply a small amount of the eyelash extension remover directly to the base of the lashes using a cotton swab. Allow it to sit for a minute to penetrate the adhesive. After that, gently wiggle the extension back and forth until it releases. Patience is key here, and it’s essential not to rush the process.

After all the extensions are off, cleanse your eyelids thoroughly to remove any leftover product. A gentle facial cleanser works well for this. Follow up with a nourishing eyelash serum to promote the health of your natural lashes. This step is crucial, especially after wearing extensions for an extended period.

Take care of your eyes. If you experience any irritation or discomfort during the removal process, it’s a good idea to consult with a professional. They can provide guidance and ensure that your natural lashes remain healthy and beautiful.

Removing water-resistant eyelash extensions doesn’t have to be a hassle. With the right products and techniques, you can keep your natural lashes safe while enjoying the beauty of extensions. Embrace the process, and your lashes will thank you for it.